


If you are looking for an easy and practical way to implement content filtering policies and monitor what happens on your network, keep reading. We'll show you how to use OPNSense to block inappropriate websites and monitor reports with access logs to keep your network under control.
About OPNsense
OPNsense is a user-friendly firewall based on FreeBSD and licensed under BSD, developed by the Decisio team. This solution offers a set of open source functionality and features, similar to those found in high-cost commercial firewalls. Originating as a fork of pfSense and m0n0wall in 2014, OPNsense offers intrusion detection and prevention, network flow monitoring, dynamic DNS, network-wide authentication, as well as features such as forward caching proxy and traffic shaping. In addition to protection, OPNsense also provides a dashboard that presents the current state of the network in an intuitive design.
How to block websites using OPNsense
There are several ways to block websites with OPNsense:
- Using Aliases and Firewall Rules: An effective approach is to create aliases that bring together several IP's and URL's, making them referenceable in firewall rules and other system configurations. This simplifies rule management and allows you to establish policies in a more organized way.
- Using Transparent Proxy: OPNsense supports packages like Squid. Squid is an open source caching proxy server that acts as an intermediary between network clients (typically web browsers) and web servers on the Internet. Its main function is to improve the performance and security of web traffic.
- Using Third-Party Packages: In addition to Squid, you can also consider installing content filtering packages such as SquidGuard or DansGuardian to block websites based on content categories.
- Using External DNS Filter Services: An efficient and highly configurable option is to integrate external DNS filter services into OPNsense. This allows you to block access to inappropriate or unwanted websites directly through domain name resolution. Popular services, like OpenDNS (now Cisco Umbrella), SafeDNS, or Lumiun DNS , offer lists of blockable website categories and let you customize which types of content you want to restrict.
Content Filtering Services for OPNsense
By configuring OPNsense to use an external DNS filter service, you can implement website blocking policies based on categories such as adult content, games, social networks, etc. This approach is effective and relatively simple to configure, making it a convenient alternative for controlling Internet access on your network.
There are many content filtering services available on the Internet that can be used with OPNsense to block access to specific websites. Some examples include:
- OpenDNS : is a DNS service provider that offers content filtering options. You can configure OPNsense to use OpenDNS DNS servers and enable the content filtering options you want.
- OPNsense plugin (Cloudfence) : A free plugin developed by Cloudfence, a free version of the company's commercial version.
- SafeDNS : It is also a DNS service provider, it has a basic web filter, you can easily configure it on your OPNsense.
- Lumiun DNS : is a Brazilian system that performs content filtering in integration with OPNsense. With more than 70 intelligent filters, it is possible to monitor access in real time through insights and reports pages. Its use is agile and uncomplicated, eliminating the need to install new software or purchase additional equipment.
These are just a few examples of content filtering services that can be used with OPNsense. There are other options available, so it's important to do detailed research before choosing a service.
How to block inappropriate websites with Lumiun DNS & OPNsense
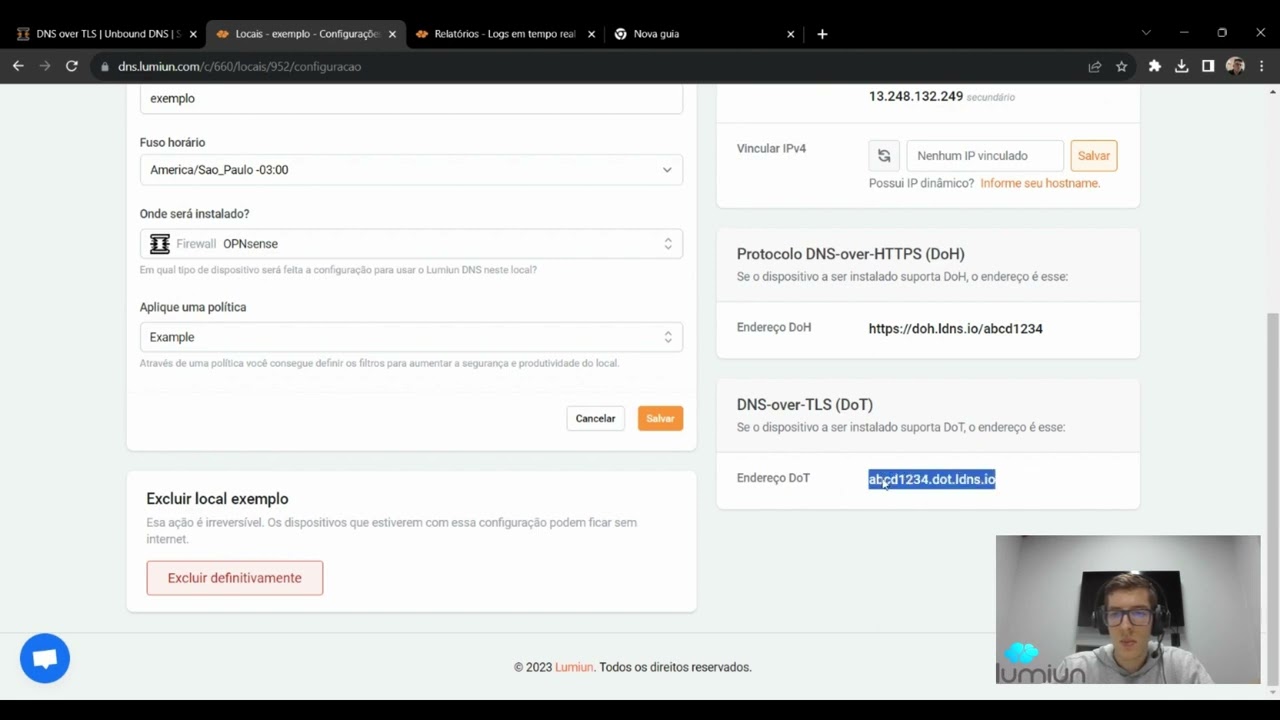
Lumiun Lumiun DNS is a new DNS filtering and content classification service designed to easily integrate with OPNsense, simplifying the process of blocking, allowing websites, and viewing comprehensive network reports, including real-time logs. Blocking is carried out using the DoT protocol (DNS over TLS), which can be configured on your server, router or any other device. This configuration directs DNS requests via the DoT protocol on port 853, to Lumiun servers. This provides an additional layer of security and control over internet access on your network.
See a step-by-step guide on how to install Lumiun DNS on OPNsense.
Step 1: Create an account on Lumiun DNS
Visit https://dns.lumiun.com/register to create your free account. When creating the account, you will be using the Starter plan. Basic Protection and Adult Content filters .

Step 2: Confirm registration via email
After registering, confirm your account using the “Verify Email” in the email that was sent to you. If the email is not in your inbox, check your Spam folder and mark it as “Not Spam” to receive the next ones.

Step 3: Complete the initial steps
After clicking the confirmation link, you will be redirected to the Lumiun DNS . To facilitate the experience, a page with 4 initial steps is displayed.
The first step is to enter your organization's name and contact phone number.

The next initial step is to create the policy. Through the policy it is possible to select locations, activate filters and block applications and websites.

Step 4: Register new location
In Lumiun DNS a location identifies a network, device or place that you want to control and protect.
To register a location, fill in the name field, select the zone, the device on which Lumiun DNS will be configured, in this case OPNsense , select the policy created in the previous step and click the “Next” .

Step 5: Configure OPNsense
When you reach the last initial step, you will have the OPNsense installation guide.

To assist you, the Lumiun support team has provided a complete article with step-by-step instructions for installing Lumiun DNS on OPNsense using DoT.
A video tutorial is also available with complete guidance for installing Lumiun DNS on OPNsense.
Step 5: Enable blocking filters
Back in the Lumiun DNS dashboard , click on the “Policies” menu at the top of the page, select the newly created policy and in the security and privacy section, enable the desired filters. There are more than 70 filters available for the PRO Plan.

“Focus and productivity” section , you can enable adult content blocking.

Step 6: Block specific websites
In the PRO Plan, you have other features available such as the Block List, Custom Block Page, Unlimited Policies and Locations and others .
Step 7: Test the lock
“Adult content blocking” filter Lumiun DNS blocking screen will be displayed.

In the PRO Plan, you can customize the lock page with your logo and preferred message.
Step 8: View reports
Reports menu to view statistics on your OPNsense access requests.


Lumiun DNS Partner Program
If you are a managed services provider (MSP) looking for solutions to optimize your services and offer additional value to your customers, Lumiun DNS has a Partner Program that could be the ideal solution for your business.


