


This question is common for network administrators who use MikroTik to control the internet. After all, the action of blocking pornography and violence websites helps to avoid exposing children to explicit content on home networks and children's schools, for example, or wasting employees' time on corporate networks.
Whatever the environment, this subject is always discussed among forums and groups and that's why we decided to list 3 ways on how to block pornography and violence sites with MikroTik, along with the advantages and disadvantages of each one.
- Tip 1: Keyword blocking using layer7 protocol with WebFig
- Tip 2: OpenDNS integration
- Tip 3: Integration with Lumiun DNS
Tip 1: Keyword blocking using layer7 protocol with WebFig
In this first tip, we will show you how to block pornography and violence websites using the layer7 protocol through the MikroTik management software known as WebFig.
Step 1: Access the WebFig panel
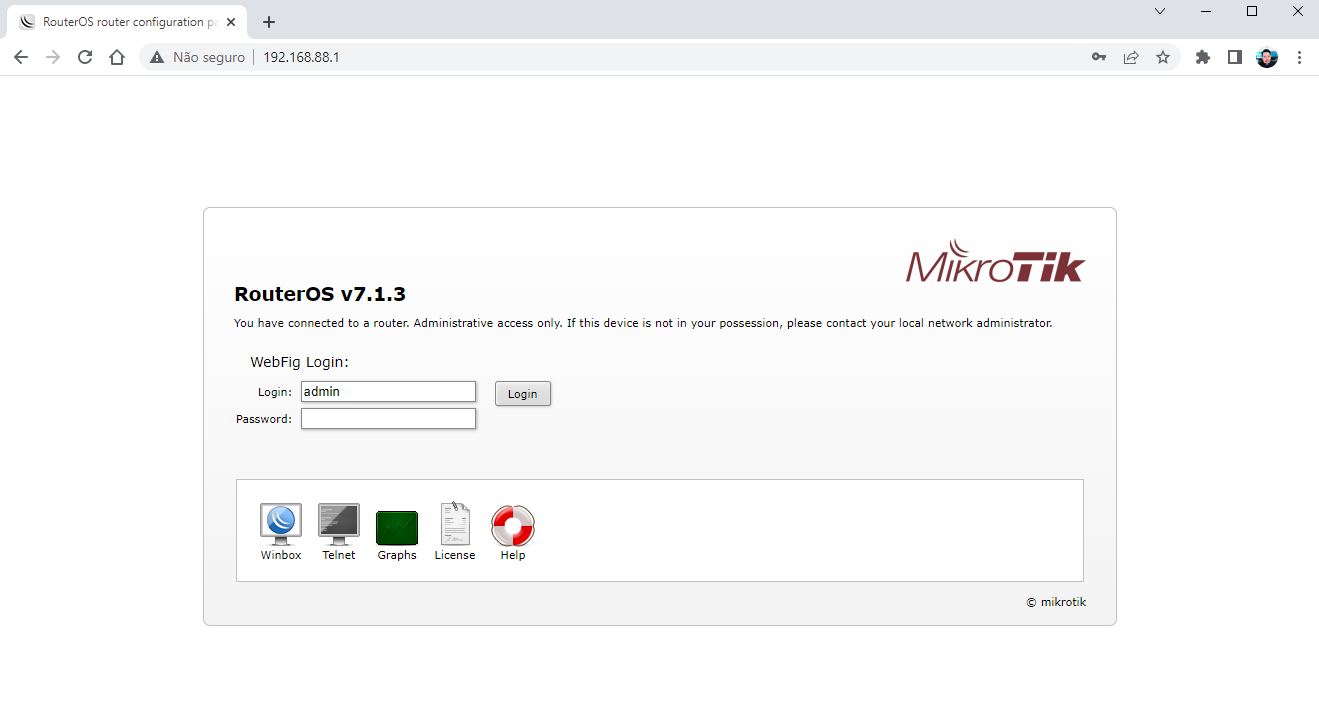
Access the web interface of your MikroTik router in your browser, for example http://192.168.88.1 , and log in.
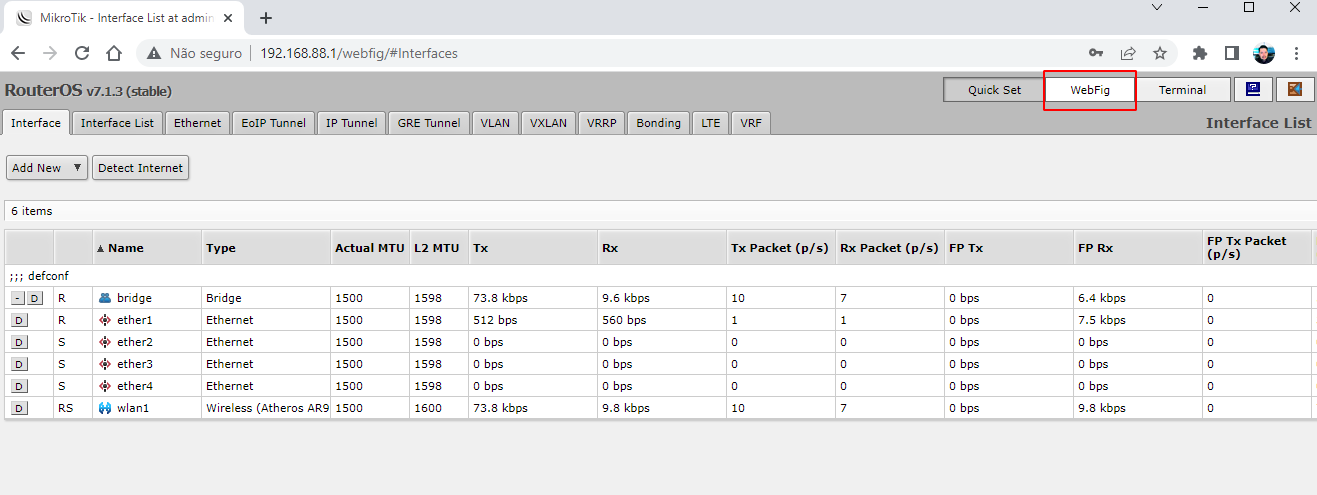
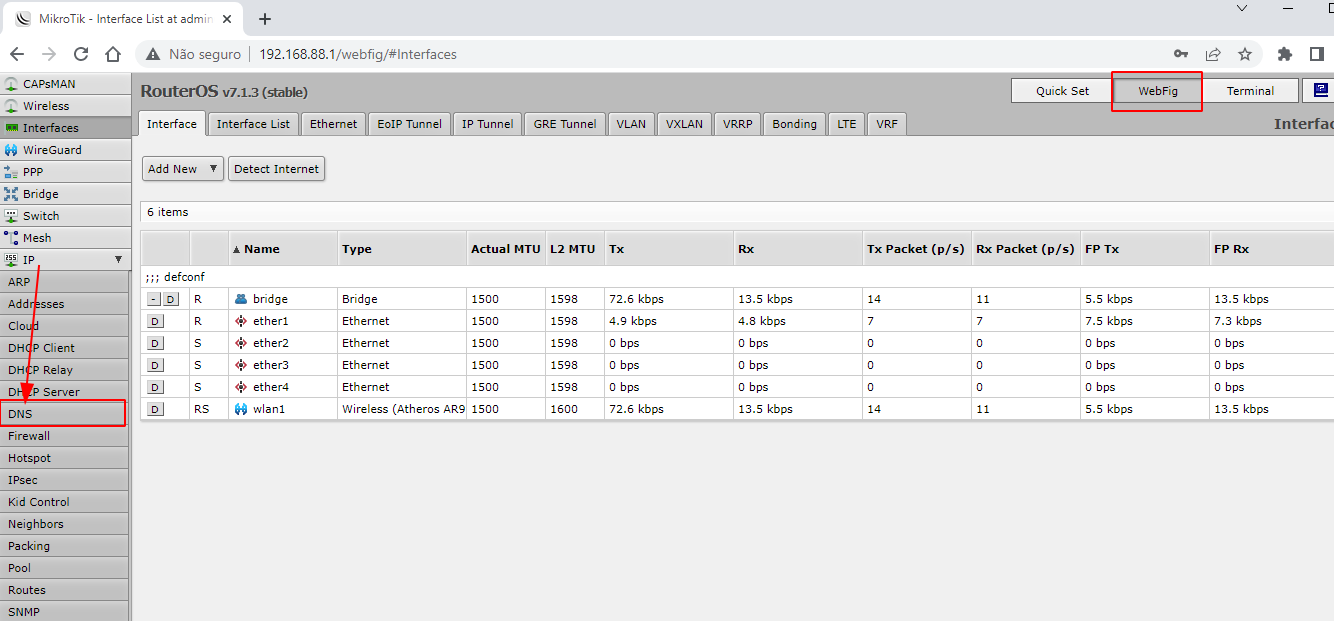
Step 2: At the top of the page, click on the WebFig button
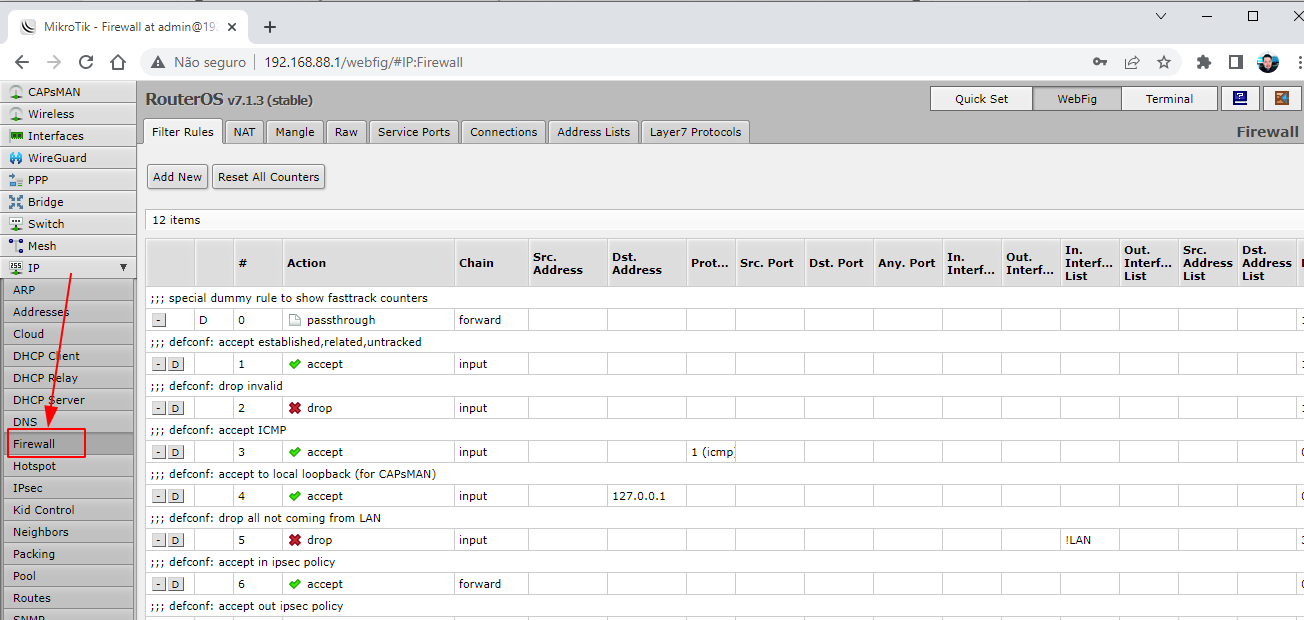
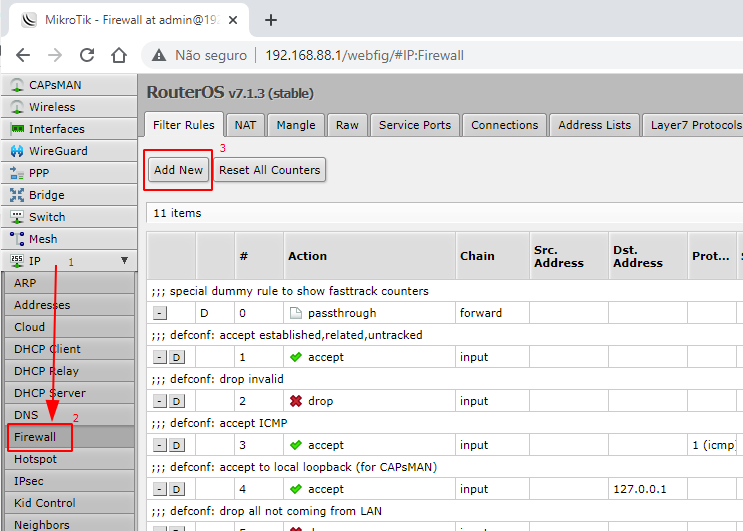
Step 3: Access the Firewall settings page
Access the IP → Firewall menu
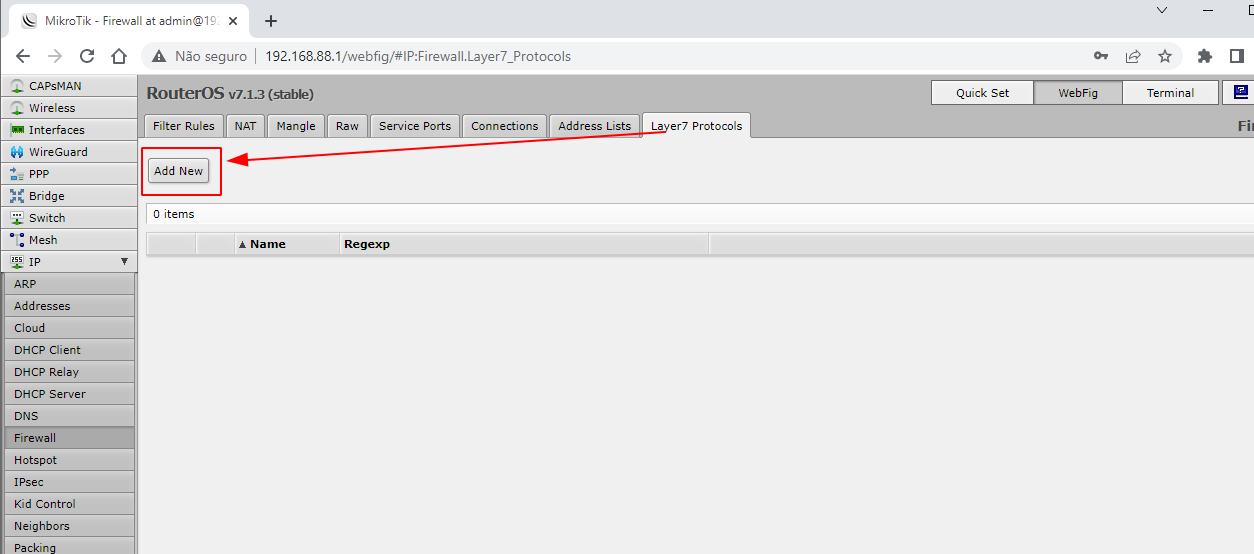
Step 4: Access form to create layer7 protocol rule (layer 7)
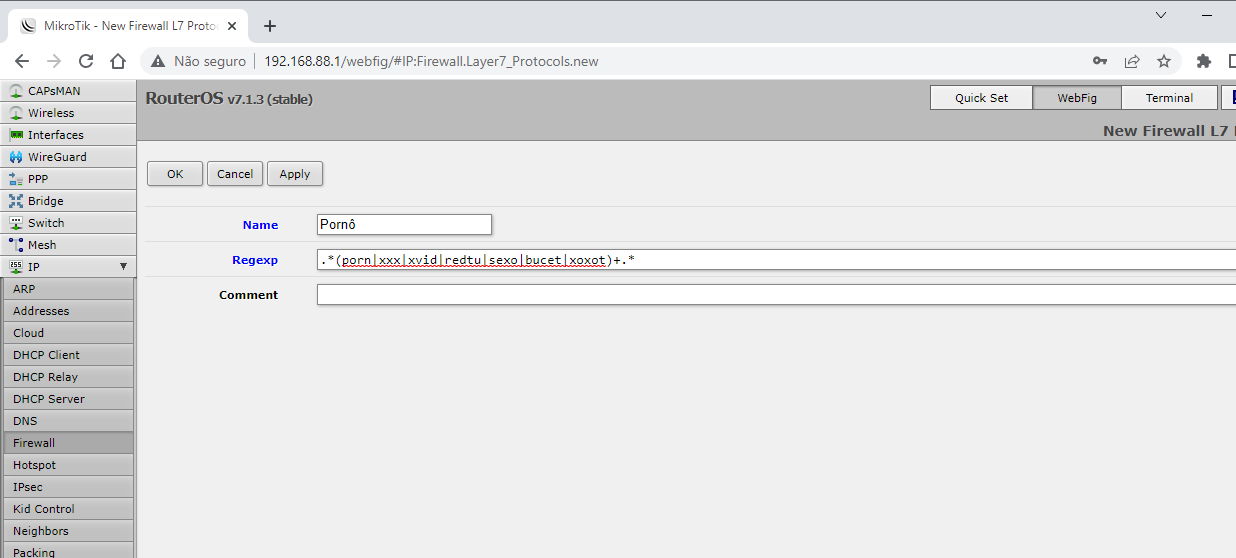
Access the “Layer7 Protocols” tab and click the “Add New” button to display the form.
Step 5: Create rules with keywords
In the “Name” field, enter a name for the rule and in the “Regexp” field, we will add a regular expression that contains the main keywords of porn sites.

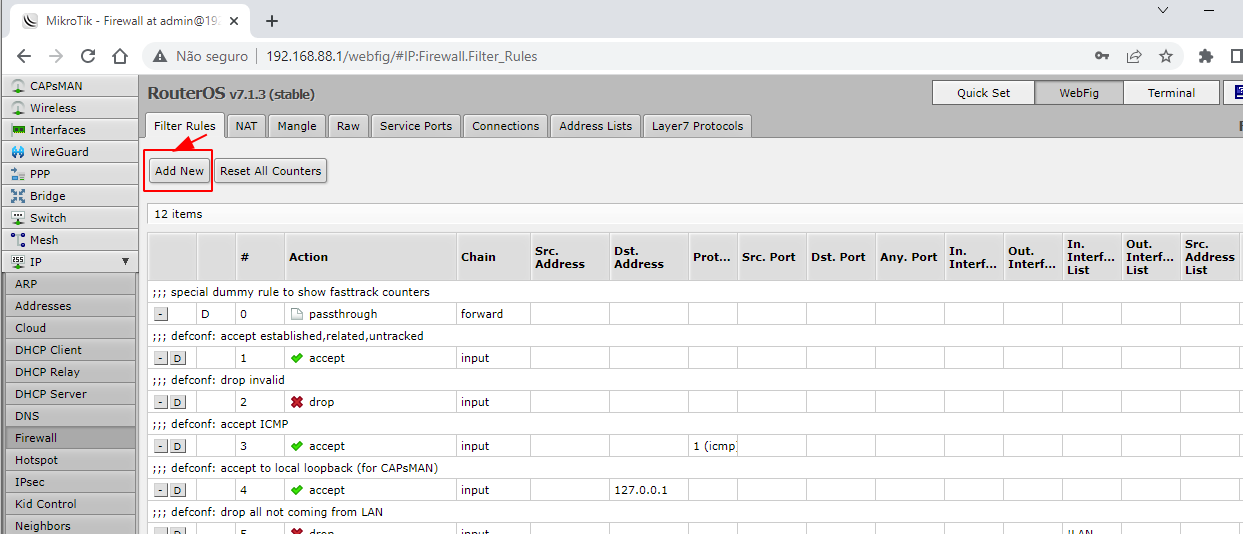
Step 6: Creating URL filtering rules
In this step you will create the filter rule to apply blocking to the rules added in the previous step.
Access the “Filter Rules” tab and click the “Add New” button.
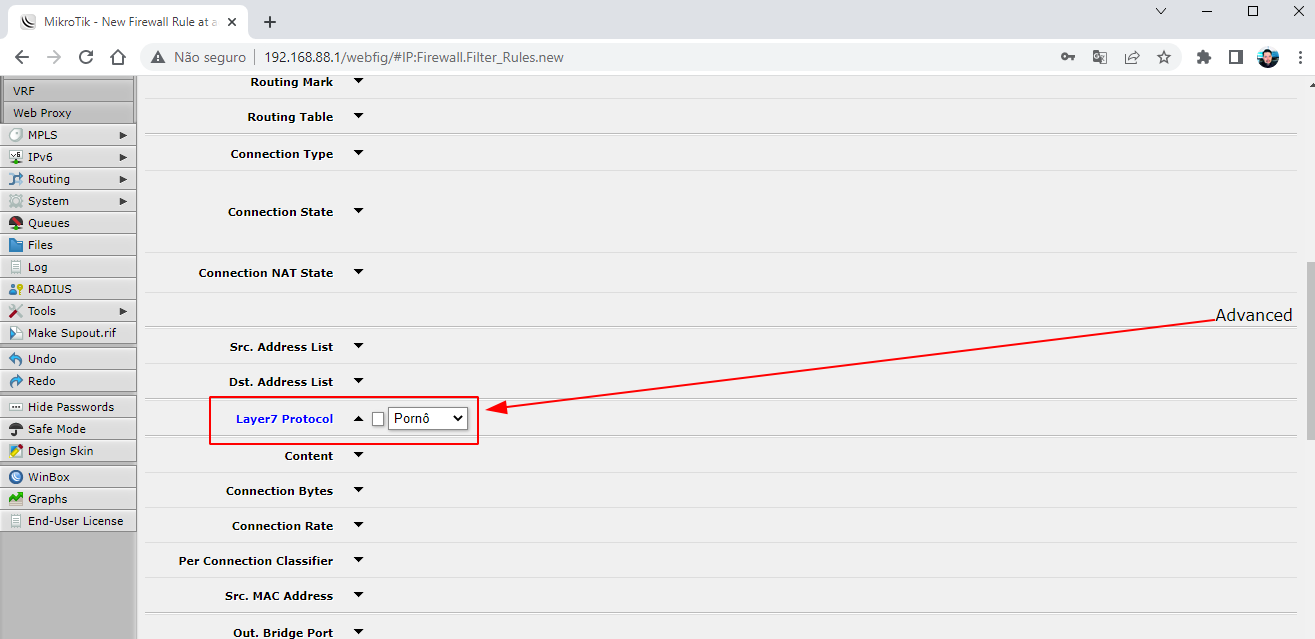
On the register new rule page, find the “Layer7 Protocol” field in the “Advanced” section and select one of the rules created in step 5.
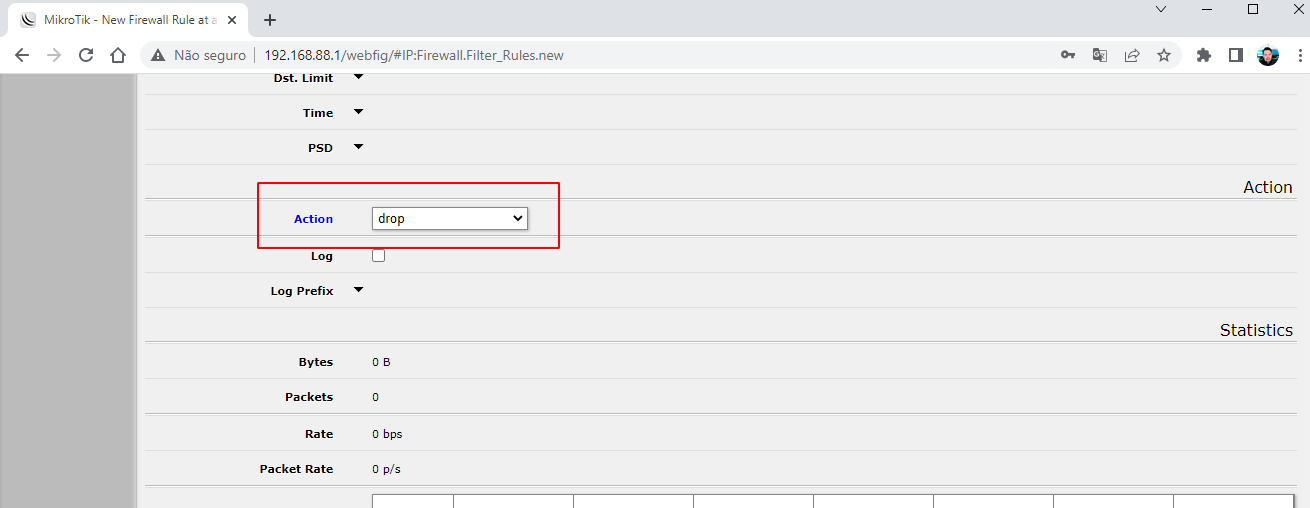
Still on the rules registration page, in the “Action” field, select the “drop” option and click the “Apply” button at the top of the page to complete the registration.
Repeat the action to create a filtering rule for all your Layer7 rules.
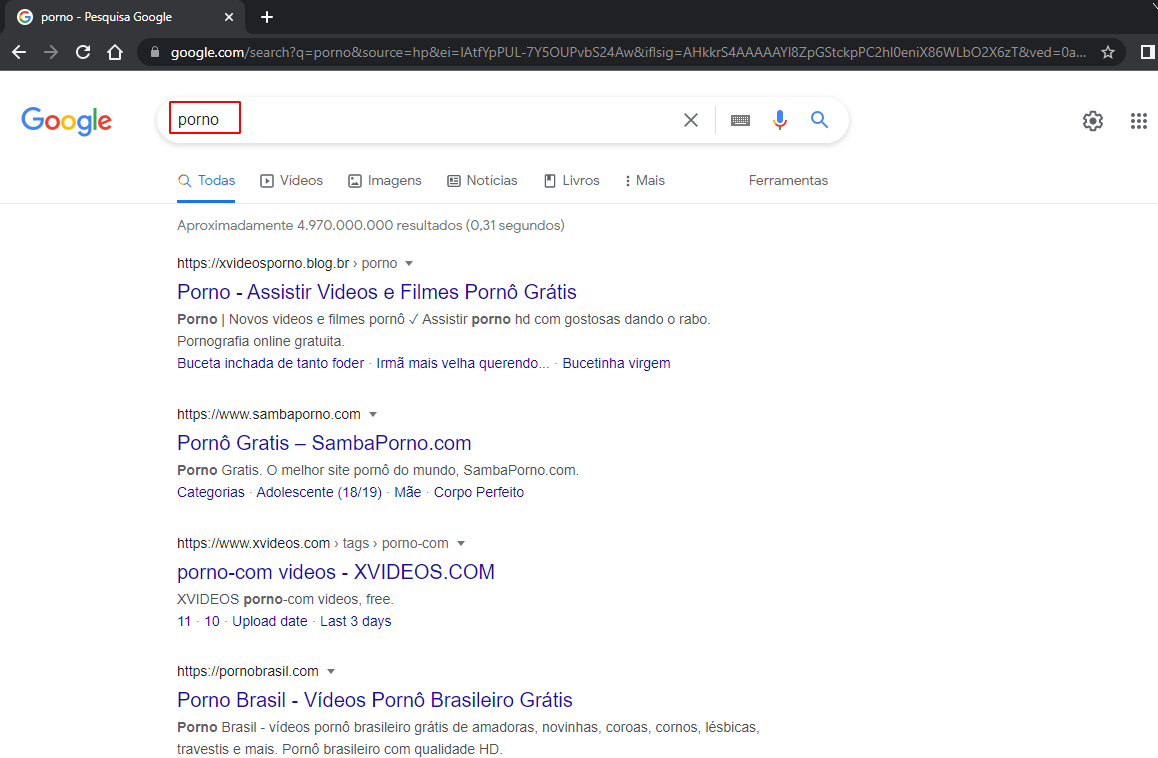
Step 7: Test the lock
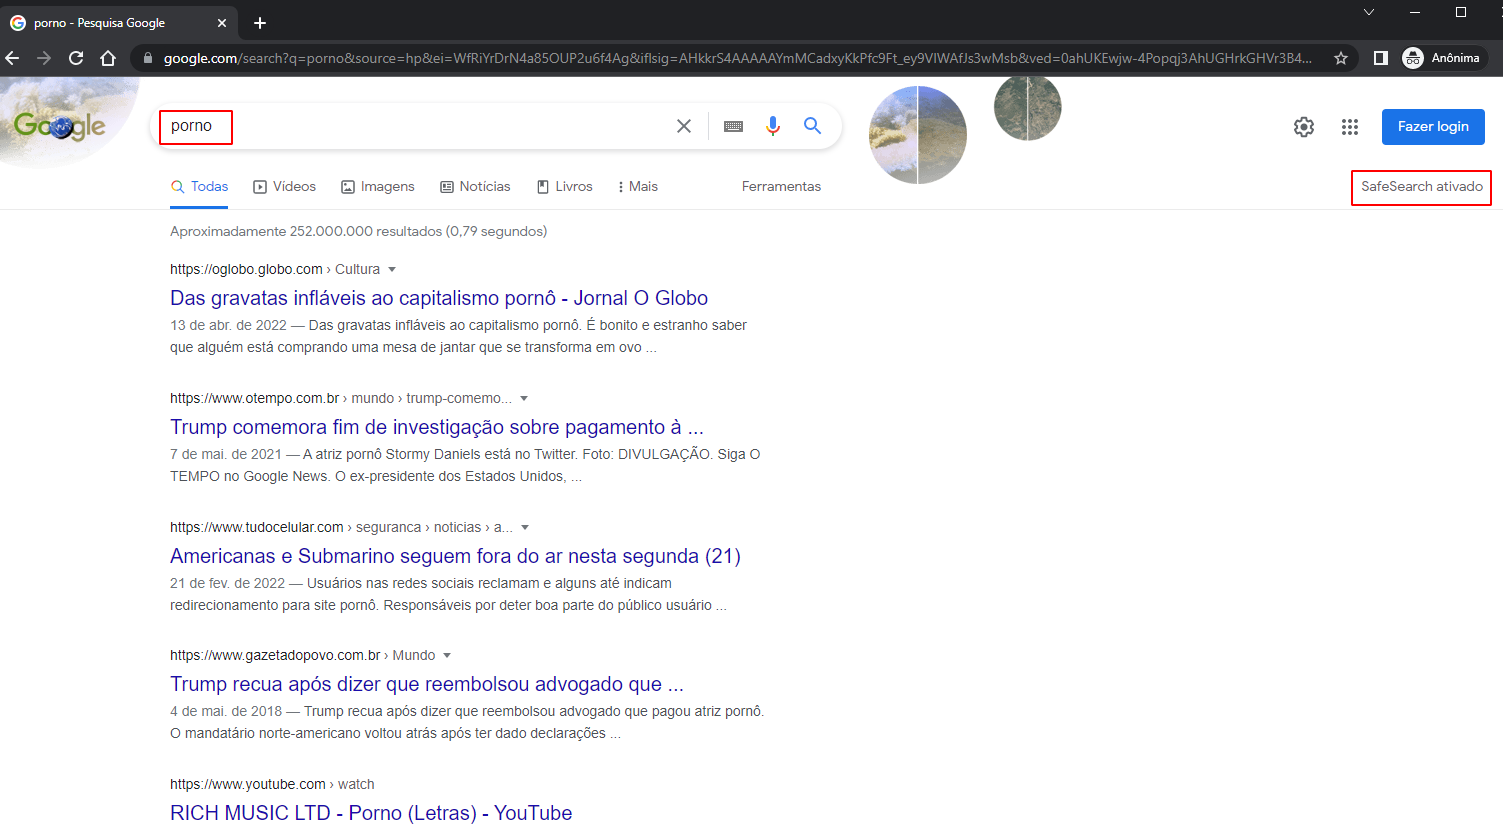
In an incognito tab on your browser, open Google, search for the term “porn” and try to access the sites that appear in the results.
Benefits
- Quick to implement
- No additional cost
- Low maintenance
Disadvantages
- Can block useful websites
- You need to access the internal network to change rules
- No blocking reports
Tip 2: OpenDNS
OpenDNS is a website filtering and classification service that can be integrated with MikroTik through DNS configuration in WebFig.
Check out the step-by-step guide to applying OpenDNS to block pornography and violence websites.
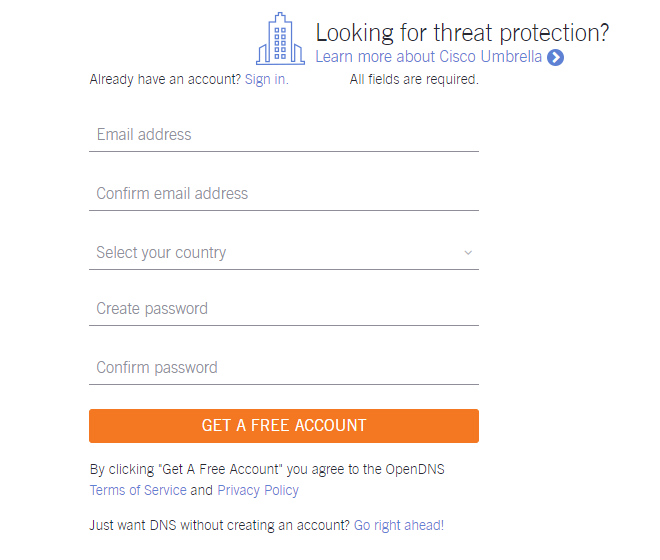
Step 1: Create an OpenDNS account
For this tip, let's create a free account on the OpenDNS Home .
Step 2: Confirm registration via email
After registering, you will receive an email from OpenDNS with a registration confirmation link. Click this link to confirm and open the control panel.

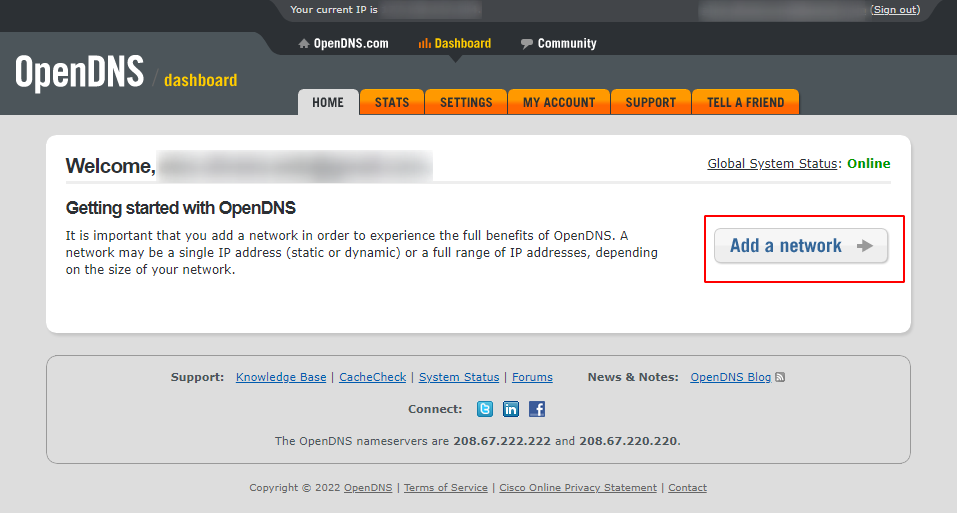
Step 3: Create new network
After clicking the confirmation link, you will be redirected to the OpenDNS control panel. On this page, we will create a new network using the “Add a network” button.
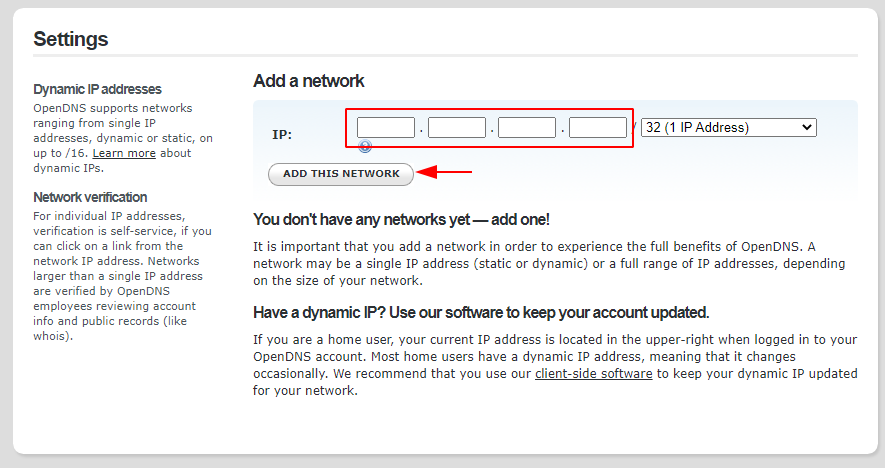
Step 4: Enter network IP
If the system does not fill in the IP automatically, enter the IP of the network you want to filter and click the “Add this network” button.
Step 5: Select blocking level
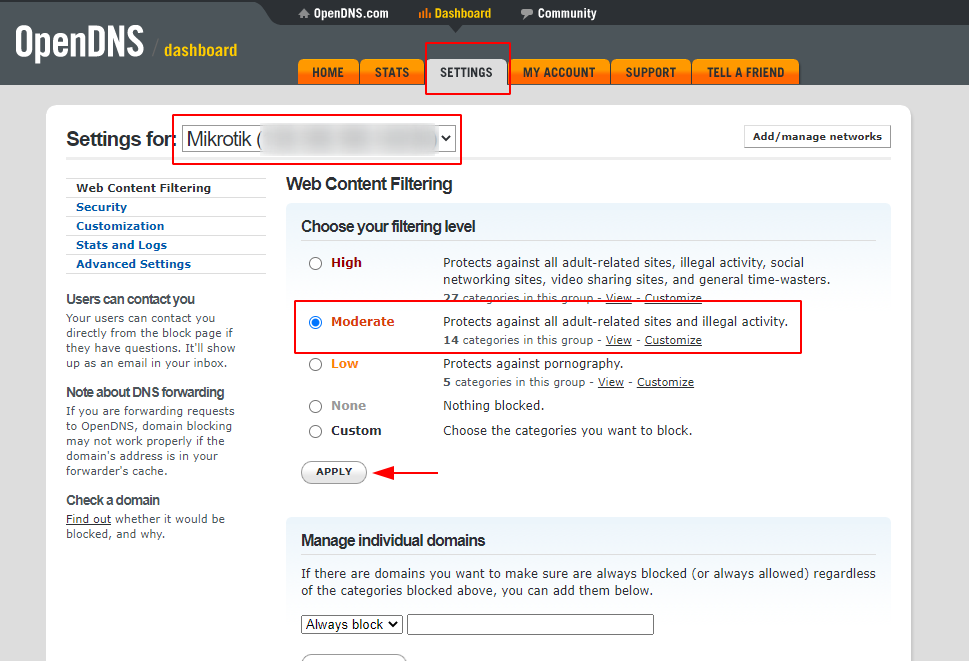
After adding the network, click on the “Settings” tab, select the newly created network in the “Settings for” field, select the “Moderate” option which includes the pornography and violence categories and finish by clicking the “Apply” button.
Step 6: Copy the OpenDNS IPs to apply to MikroTik
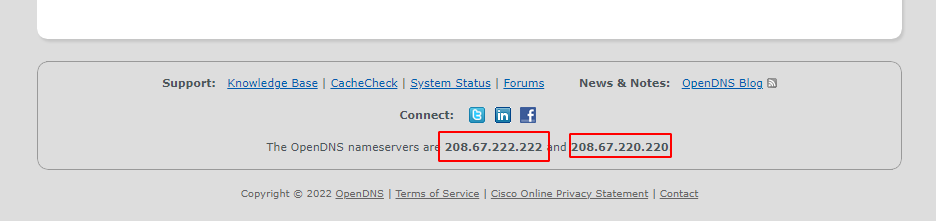
Still in the OpenDNS control panel, at the bottom of the page, copy the two IPs that will be applied in the MikroTik configuration: “The OpenDNS nameservers are 208.67.222.222 and 208.67.220.220 ”.
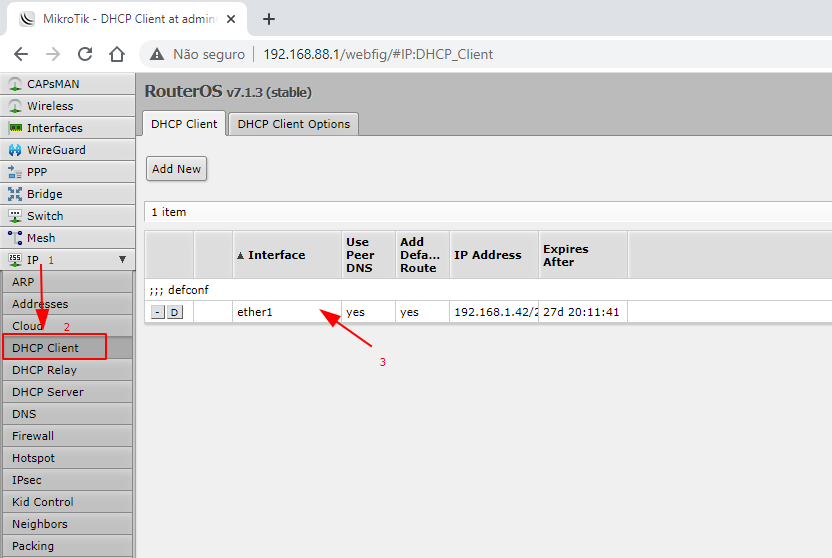
Step 7: Access DNS configuration page on MikroTik's WebFig
On the MikroTik WebFig panel, access the IP → DNS menu.
Step 8: Access DNS configuration page on MikroTik's WebFig
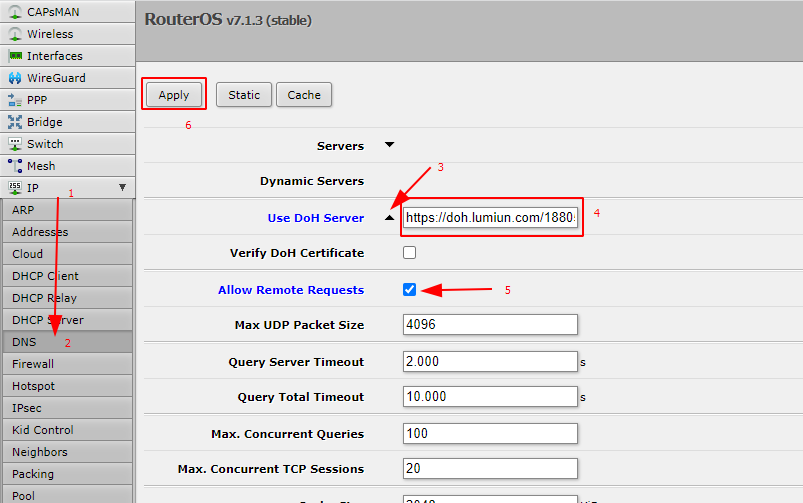
Double click on the down arrow next to the word “Servers” to open two new fields and enter the OpenDNS IPs, check the “Allow Remote Requests” option and click the “Apply” button.

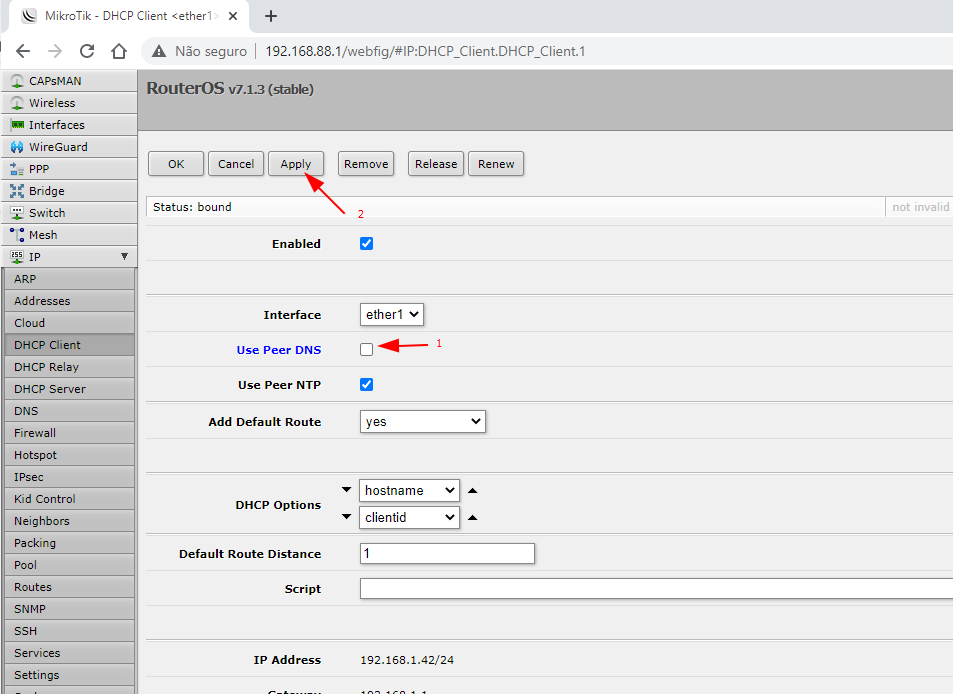
Step 9: Disable the “User Peer DNS” option
If you are using DNS information from the ISP provider or another router and information is appearing in the “Dyamic Servers” field on the MikroTik IP → DNS page, access the IP → DHCP Client menu, click on the line with the interface information, uncheck the “User Peer DNS” option and click the “Apply” button.
Step 10: Additional settings
To complete the integration with OpenDNS, follow the additional security and NAT redirection .
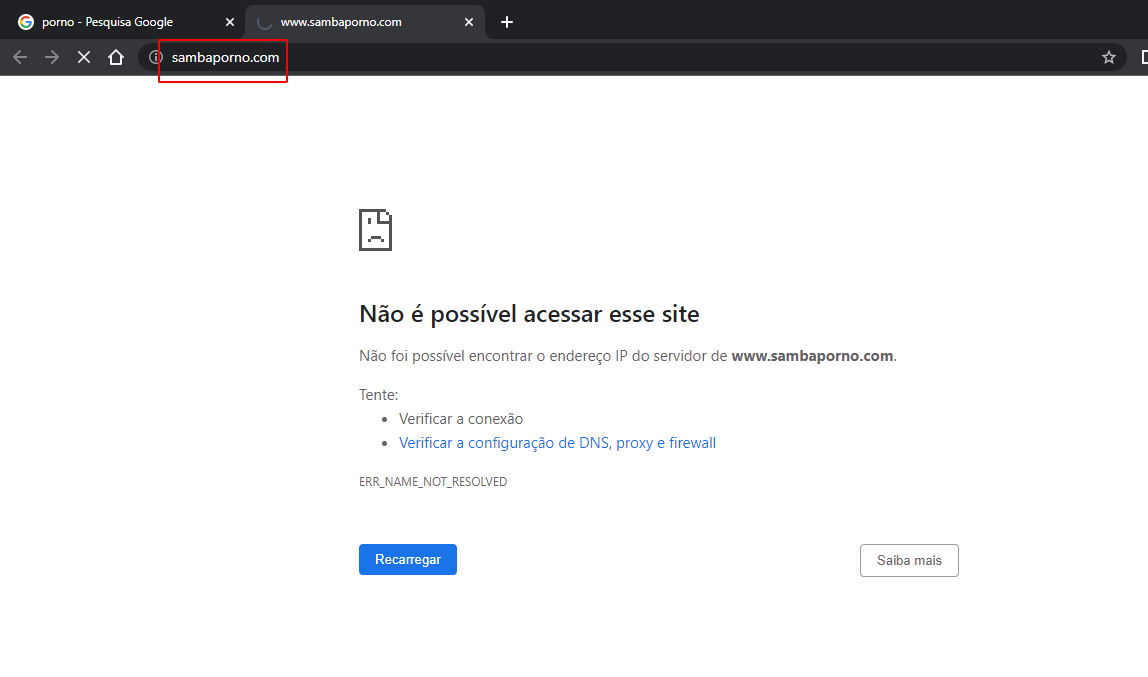
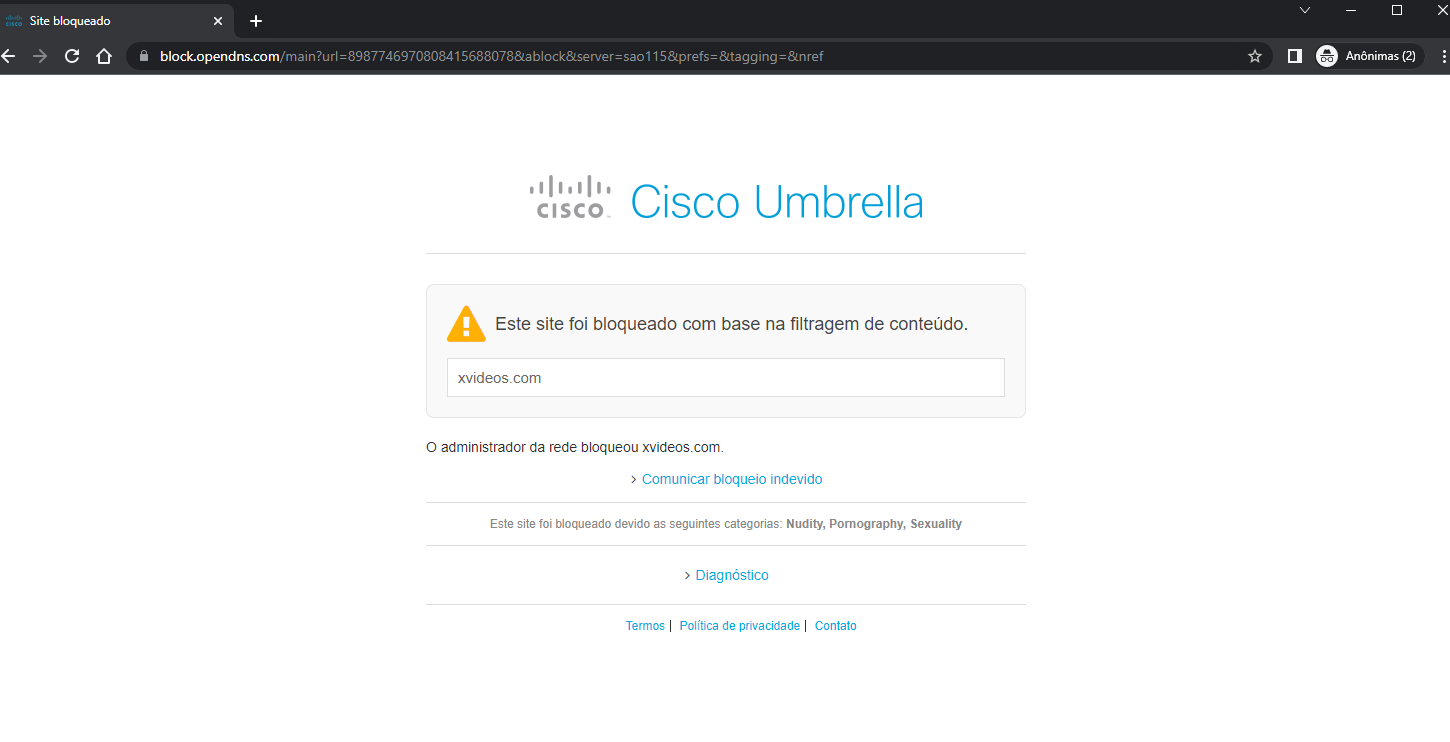
Step 11: Test the lock
In an incognito tab on your browser, access the website xvideos.com and see that the OpenDNS lock screen will be displayed.
Advantages of OpenDNS
- Free
- No need to maintain lists
- Cloud filter management
- No need for extra equipment
Disadvantages of OpenDNS
- Free version with limit of 3 networks
- No support in Portuguese
- Block lists are not standardized for the Brazilian public
- Very basic report
Tip 3: Lumiun DNS
Lumiun Lumiun DNS is a new DNS filtering and content classification service, which can be easily integrated into MikroTik through WebFig to facilitate the process of blocking pornography and violence websites.
Check out the step-by-step instructions for installing Lumiun DNS .
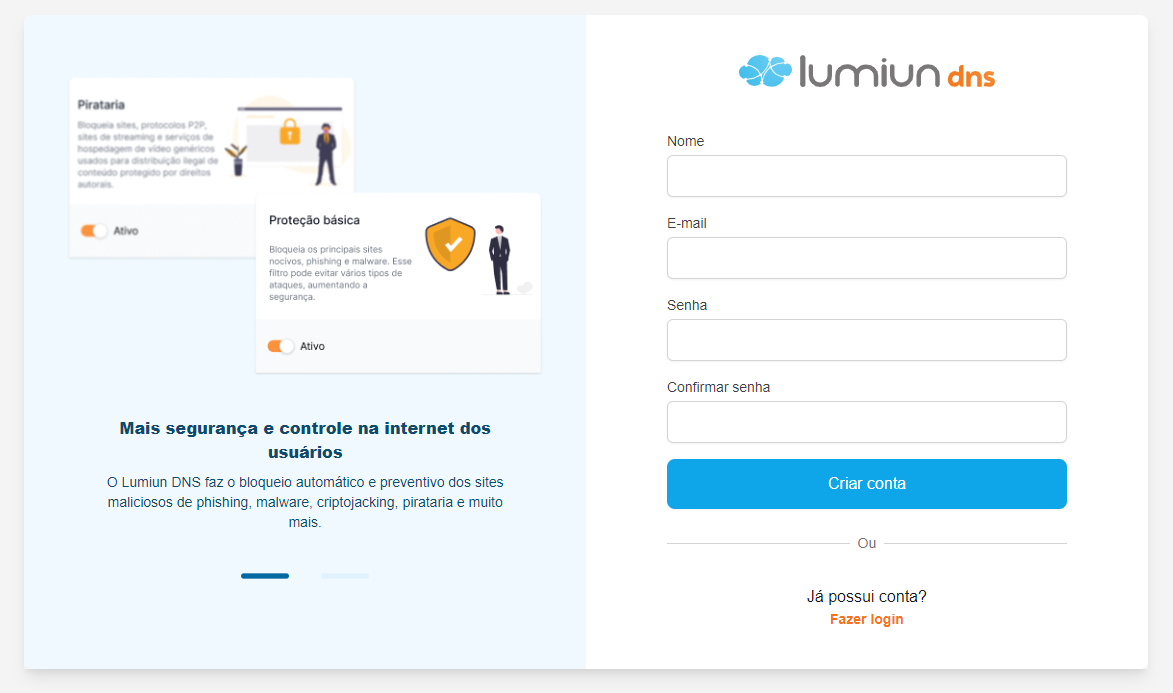
Step 1: Create an account on Lumiun DNS
Visit https://dns.lumiun.com/register to create your free account. At the time of writing this article, it is possible to all features for free 14 days and expand to another 30 days by answering a feedback questionnaire.
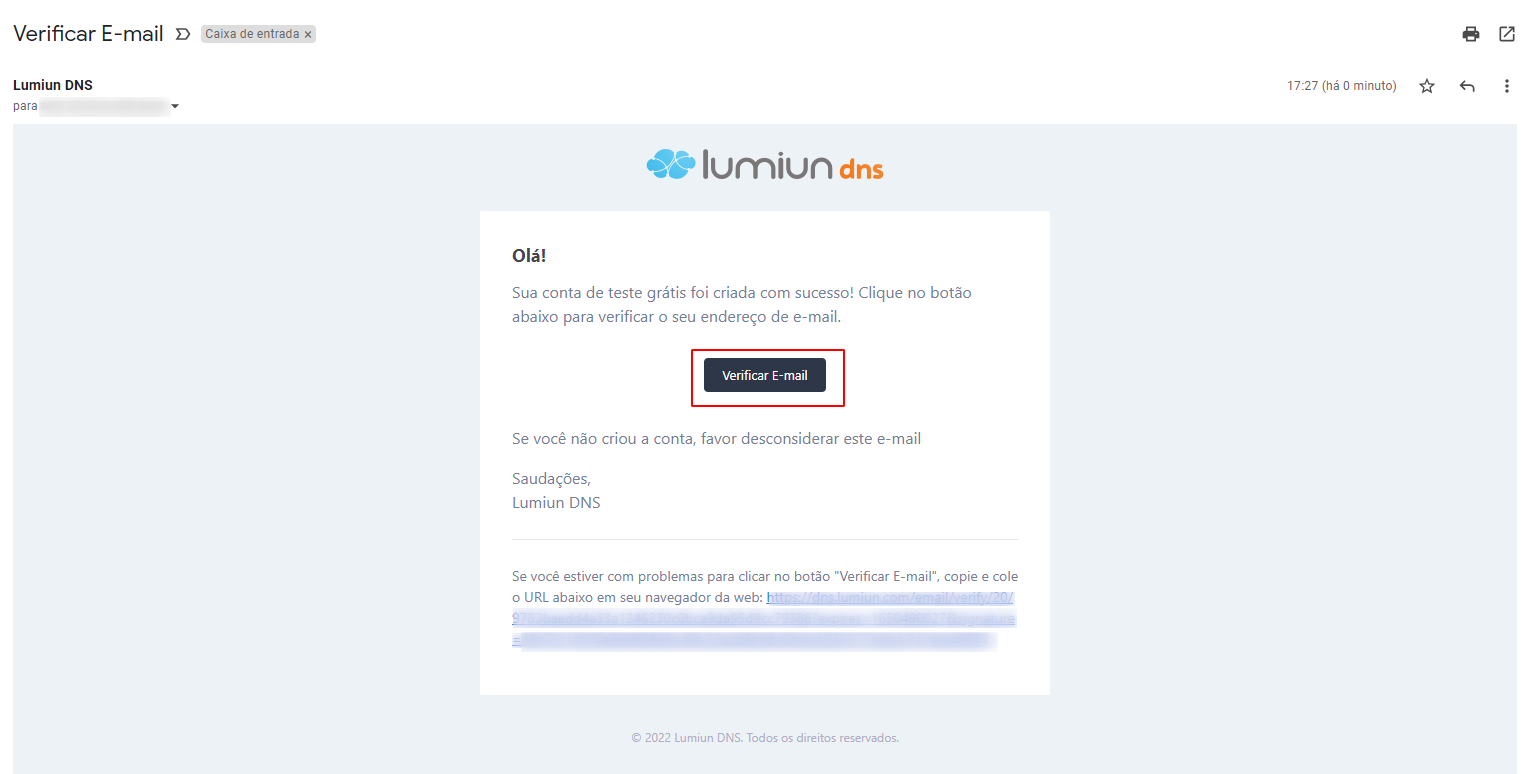
Step 2: Confirm registration via email
After registering, confirm your account using the “Verify your email” button in the email that was sent to you. If the email is not in your inbox, check your Spam folder and mark it as “Not Spam” to receive the next ones.
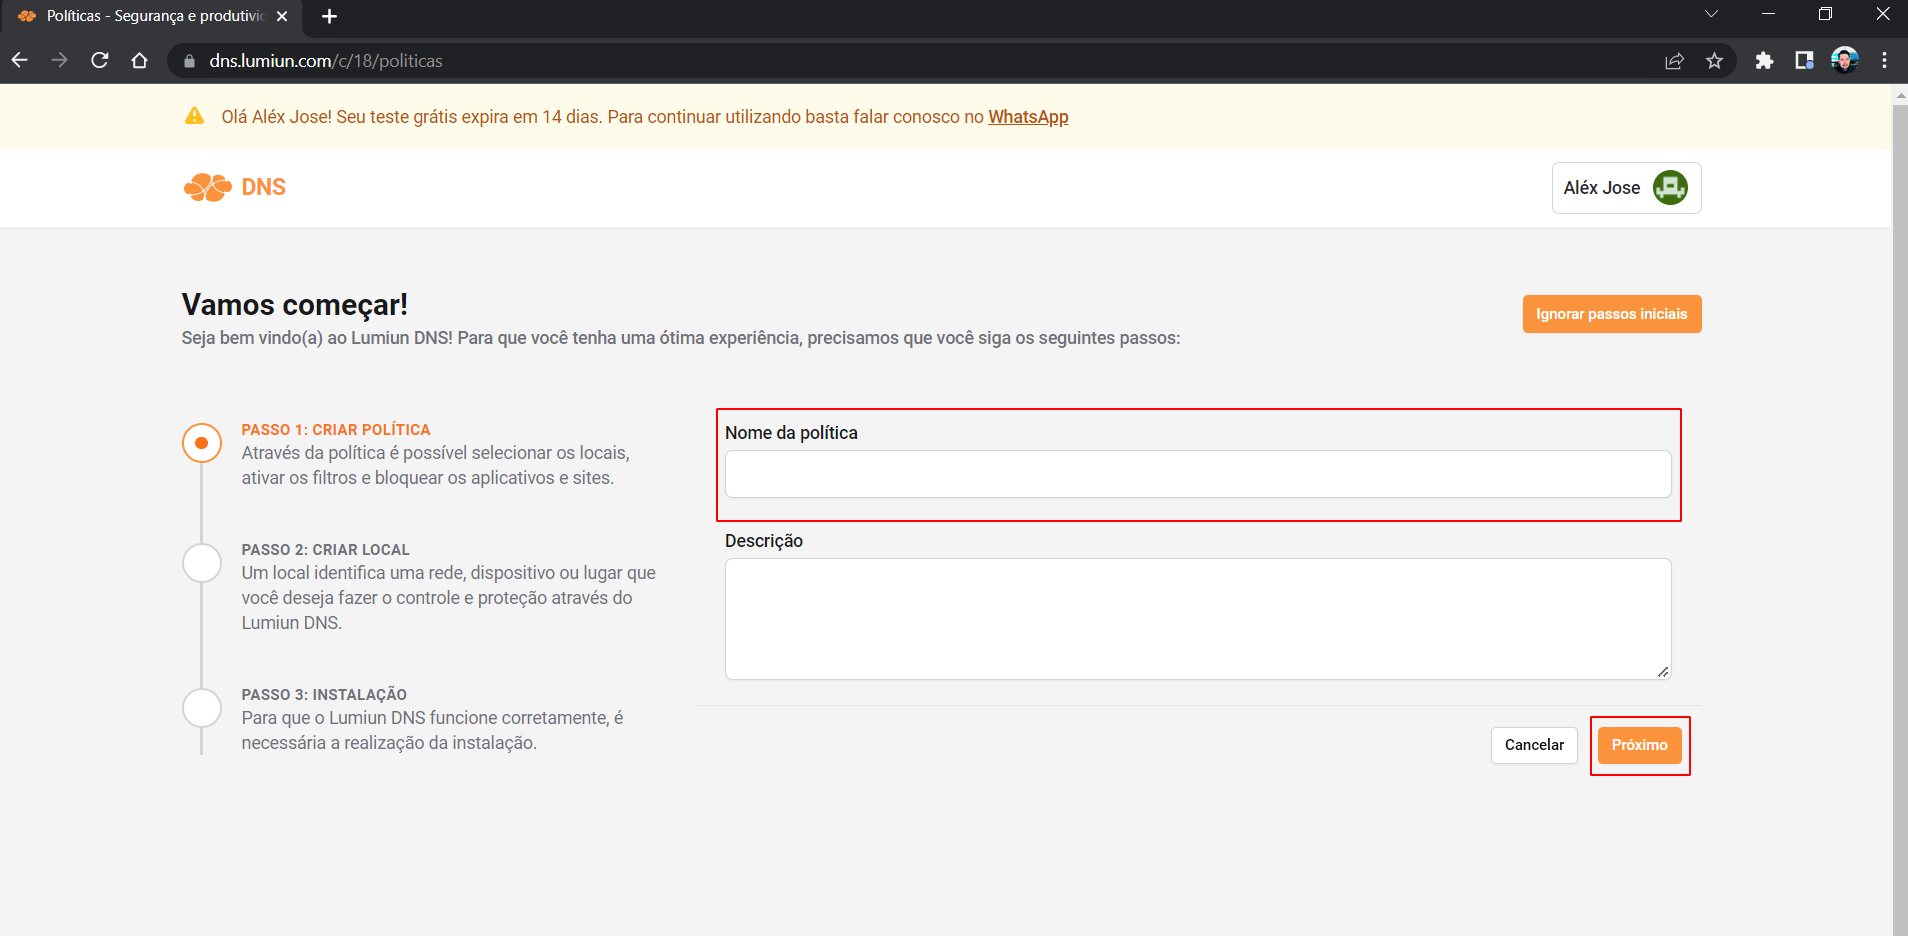
Step 3: Create new policy
After clicking the confirmation link, you will be redirected to the Lumiun DNS . To facilitate the experience, a page with 3 initial steps is displayed.
The first step is to create a policy. Through the policy it is possible to select locations, activate filters and block applications and websites.
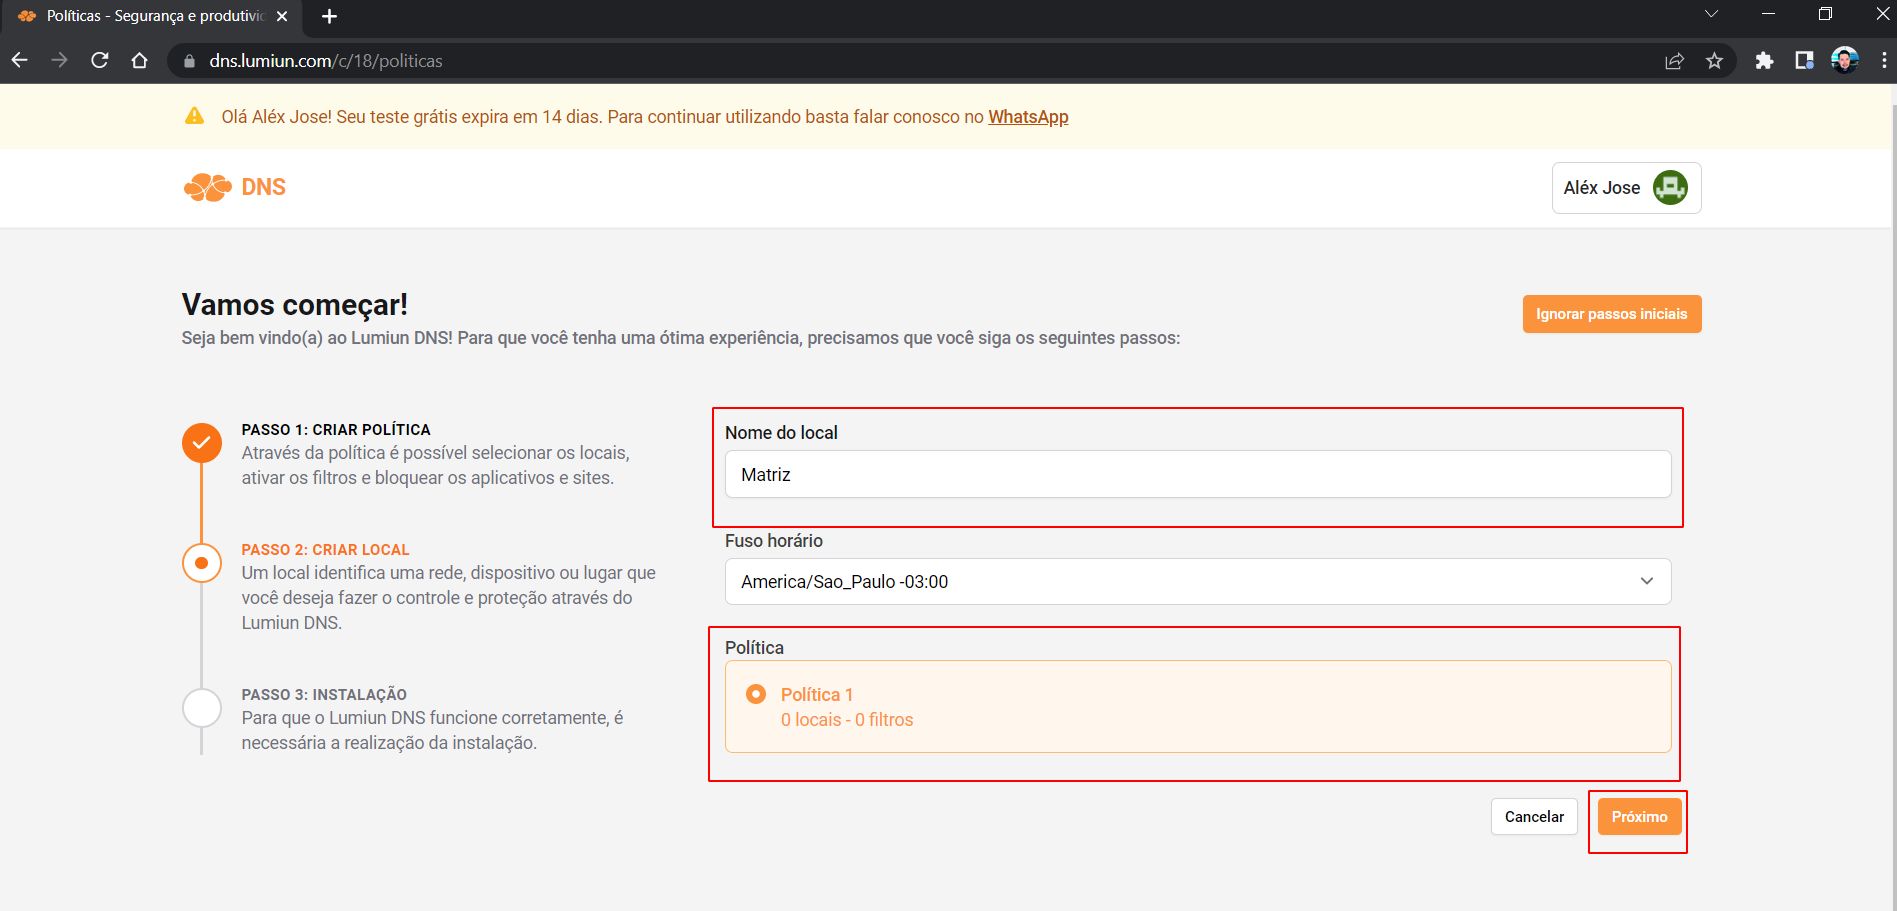
Step 4: Register new location
In Lumiun DNS a location identifies a network, device or place that you want to control and protect.
To register a location, fill in the name field, select the time zone, select the policy created in the previous step and click the “Next” button.
Step 5: Installing Lumiun DNS on MikroTik
After creating the location, you will be redirected to the installation page. Select the “MikroTik” tab and we will follow the installation instructions from this new location.
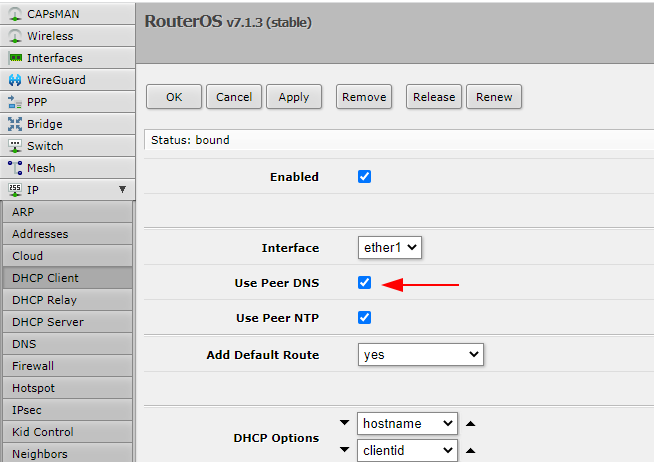
Step 6: Check if the “Use Peer DNS” option of the DHCP Client is enabled
In the MikroTik WebFig panel, access the IP → DHCP Client menu and check if the “USE Peer DNS” option is enabled for the interface of your internet link.
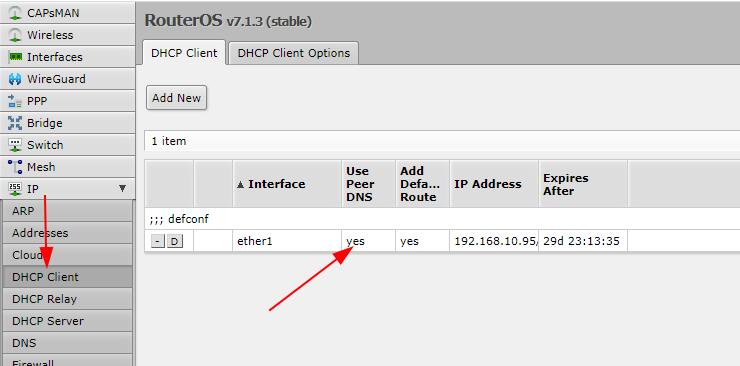
If not, you can click on the line, select the option and click the “Apply” button.
Step 7: Enter DoH address
Copy the DoH address highlighted on the Lumiun DNS installation page.

On the WebFig DNS page, click the down arrow in the “User DoH Server” field, paste the address and click the “Apply” button.
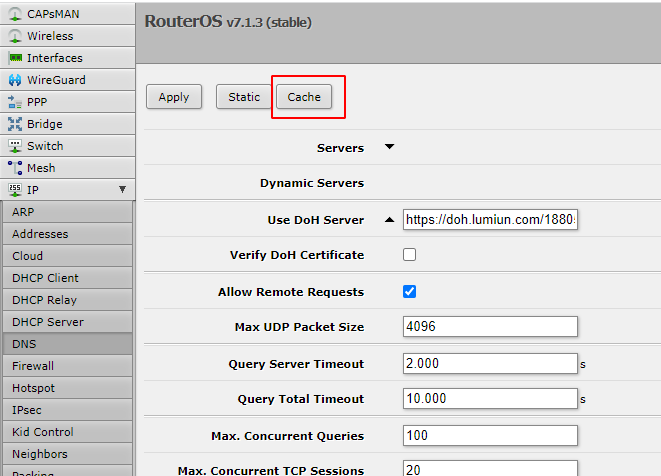
Step 8: Clear cache
Still in the IP → DNS menu, click on the “Cache” button and then click on “Flush cache”.
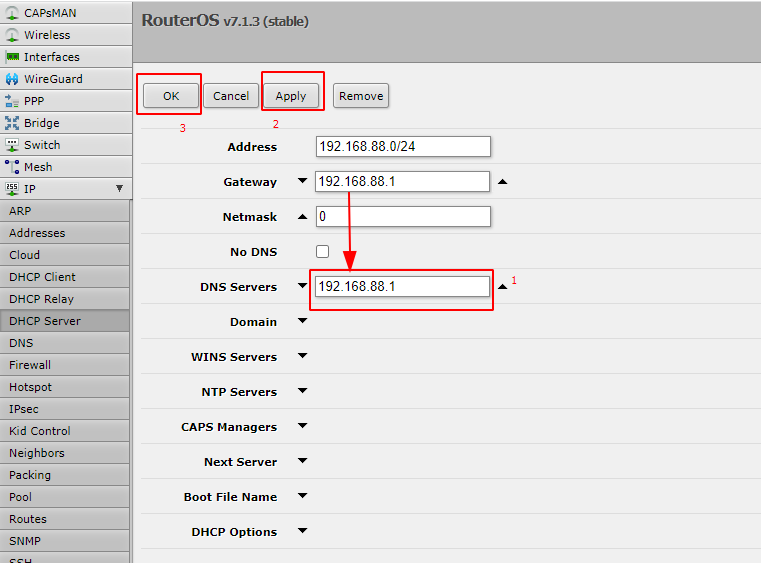
Step 9: DNS Servers
Access the IP → DHCP Server menu. Click the Networks tab. Click on the network that appears below, for example, 192.168.88.0/24.
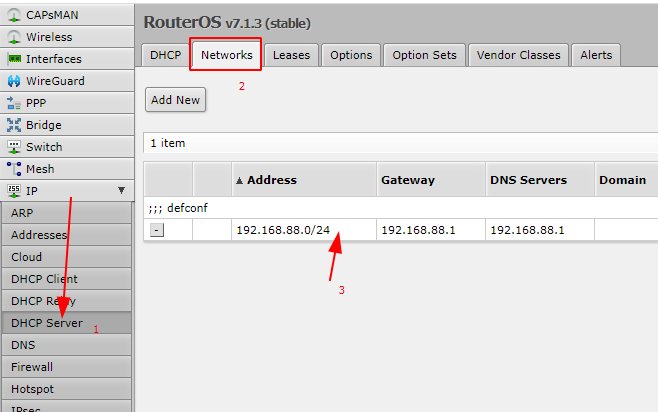
Fill in the “DNS Servers” option with the same address contained in the “Gateway” option above. Click Apply and OK.
Step 10: Enable blocking filters
Back in the Lumiun DNS dashboard, click on the “Policies” menu at the top of the page, select the newly created policy and enable the “Block Adult Content” and “Block child sexual abuse content” filters.
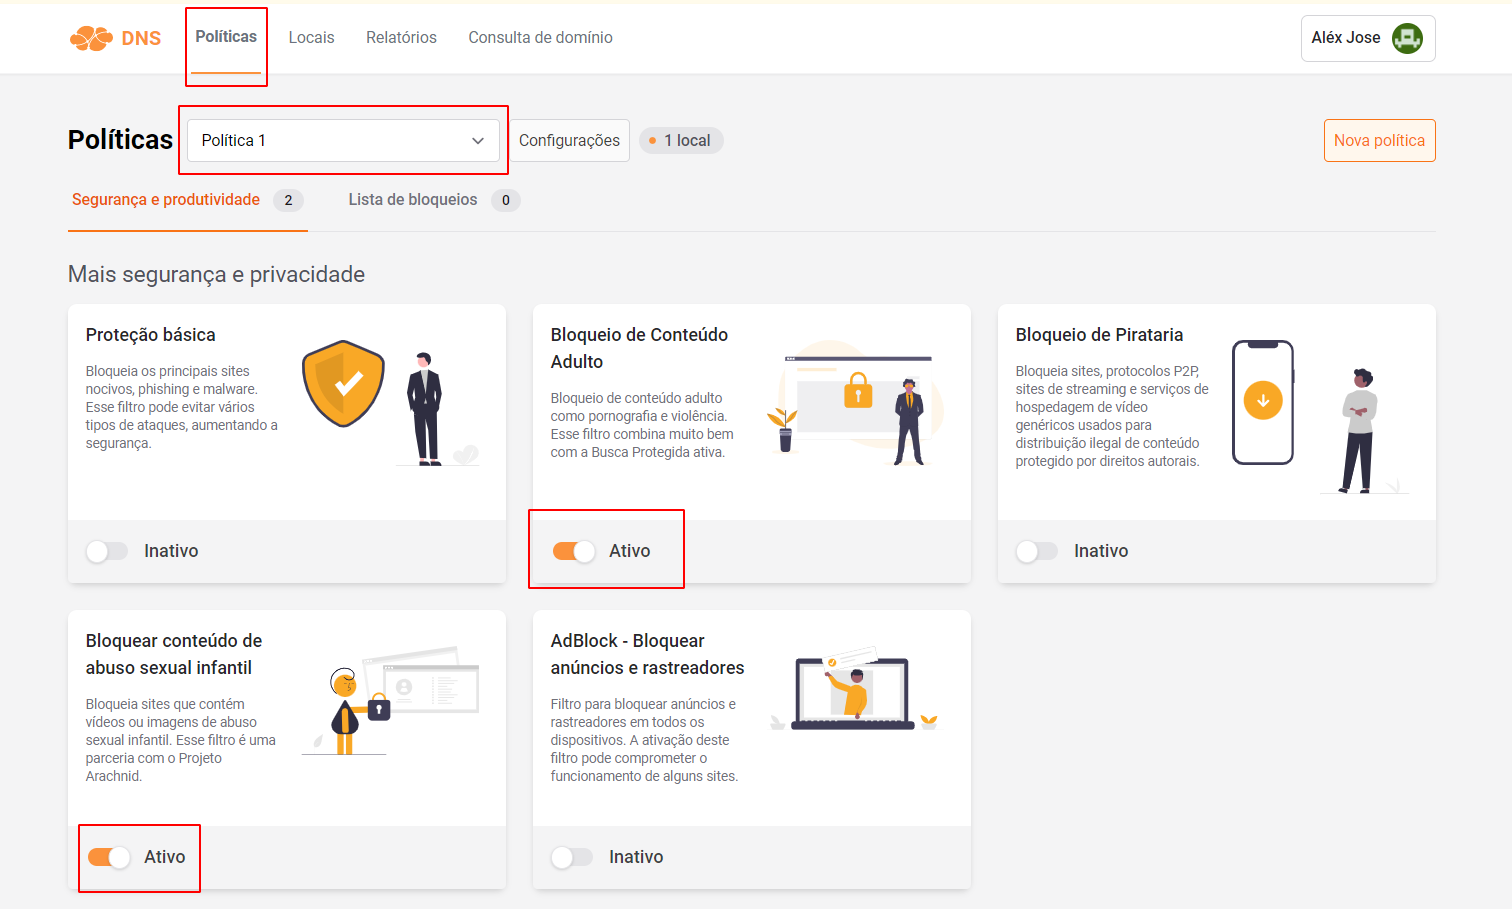
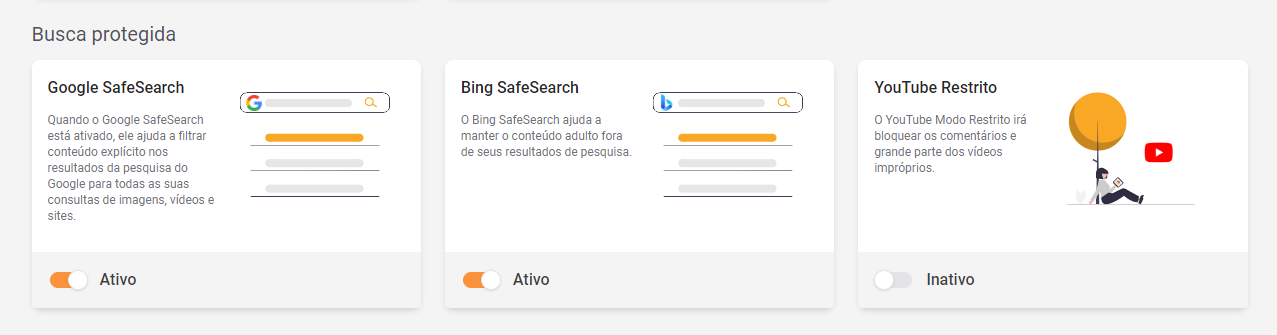
Still on the Policies page, we will activate protected search for Google and Bing. This filter will remove adult content from the search results of these search engines.
Step 11: Additional Settings
To complete the integration with Lumiun DNS security and NAT redirection steps .
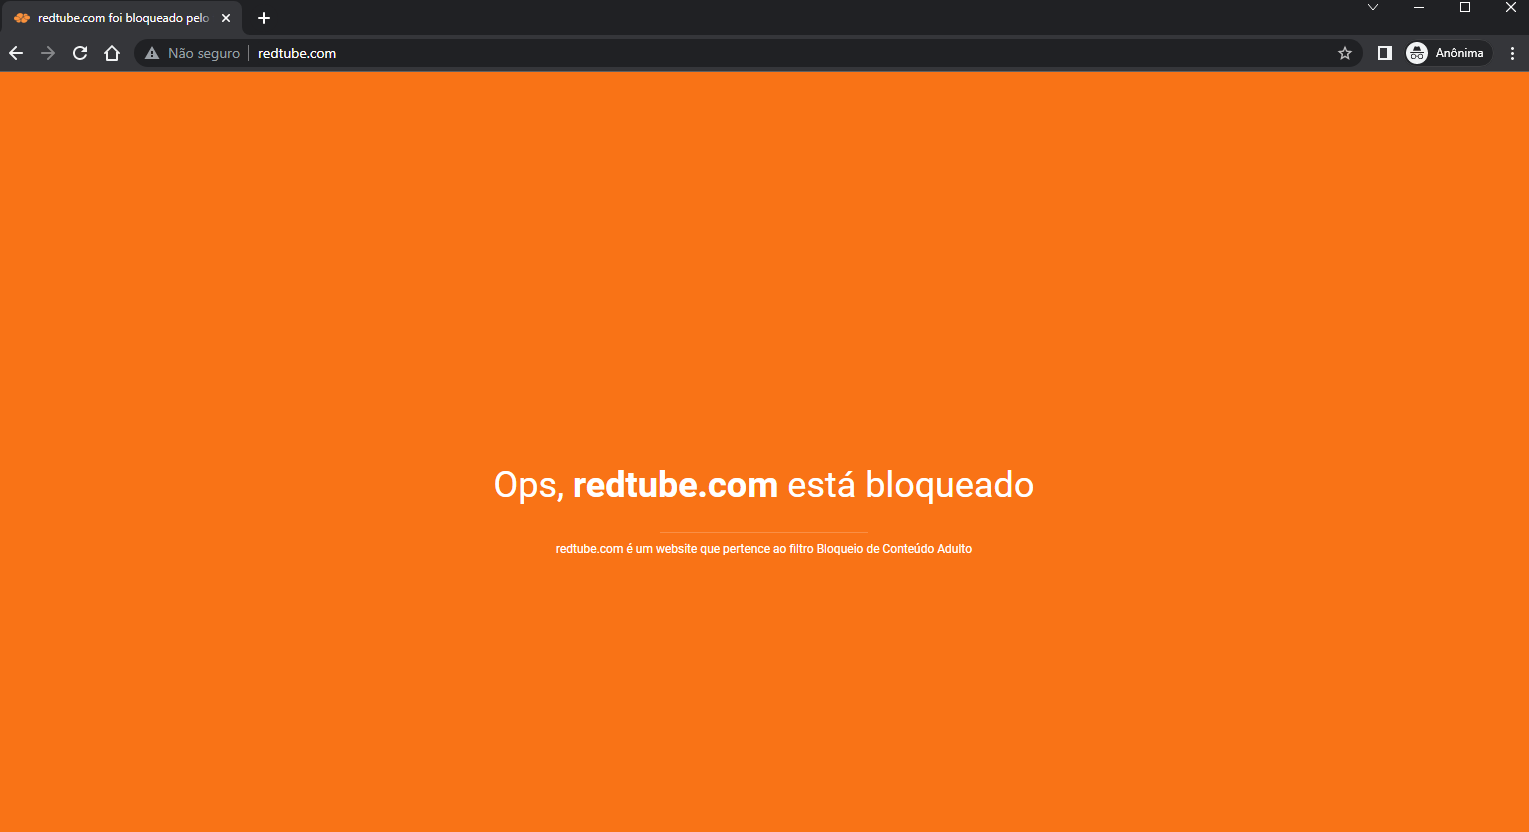
Step 12: Test the lock
In an incognito tab on your browser, access the website redtube.com Lumiun DNS lock screen will be displayed.
Advantages of Lumiun DNS
- No need to maintain lists
- Cloud filter management
- Standardized lists for Brazilian users
- No need for extra equipment
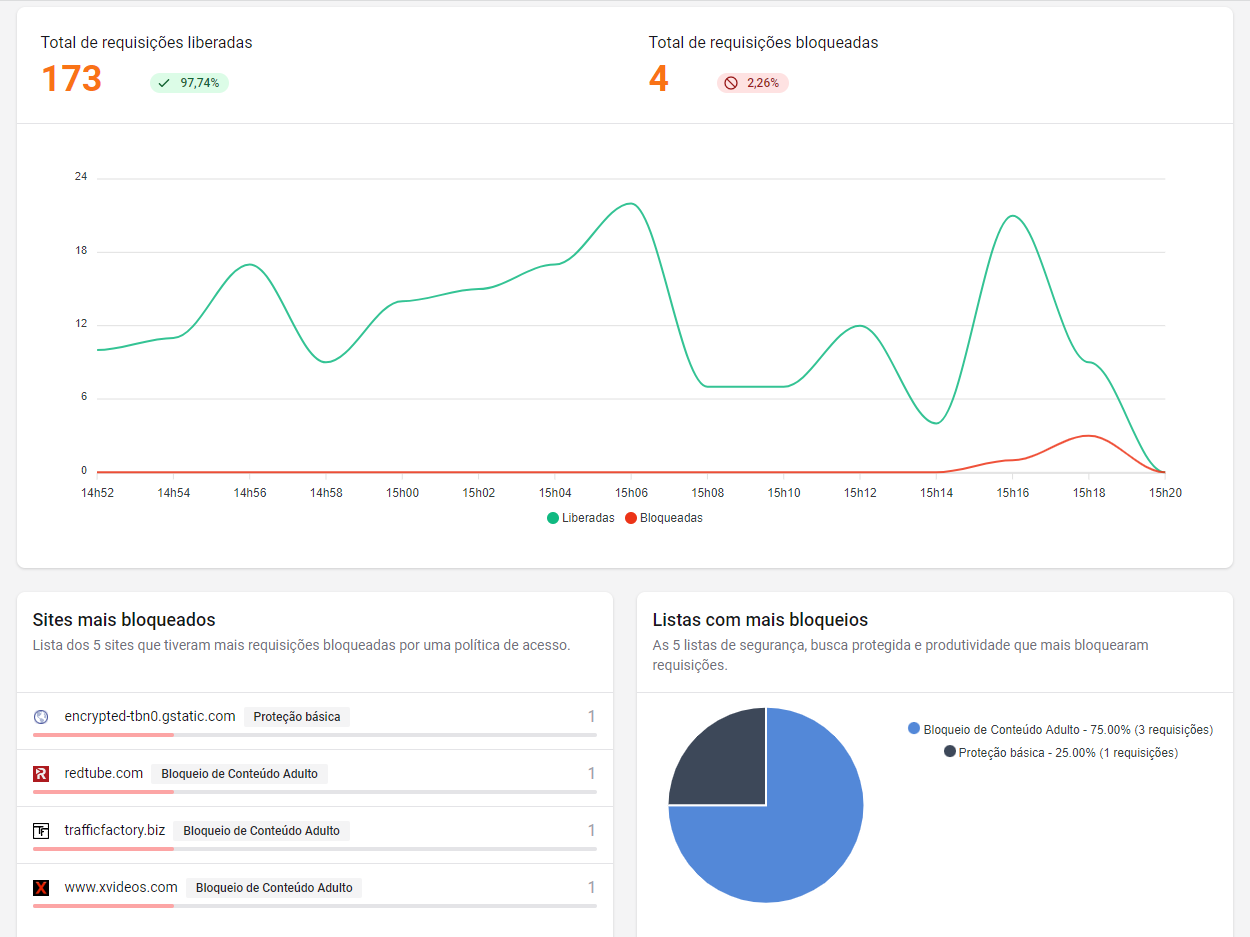
- Graph with volume of released and blocked requests
- Statistics with the most blocked websites
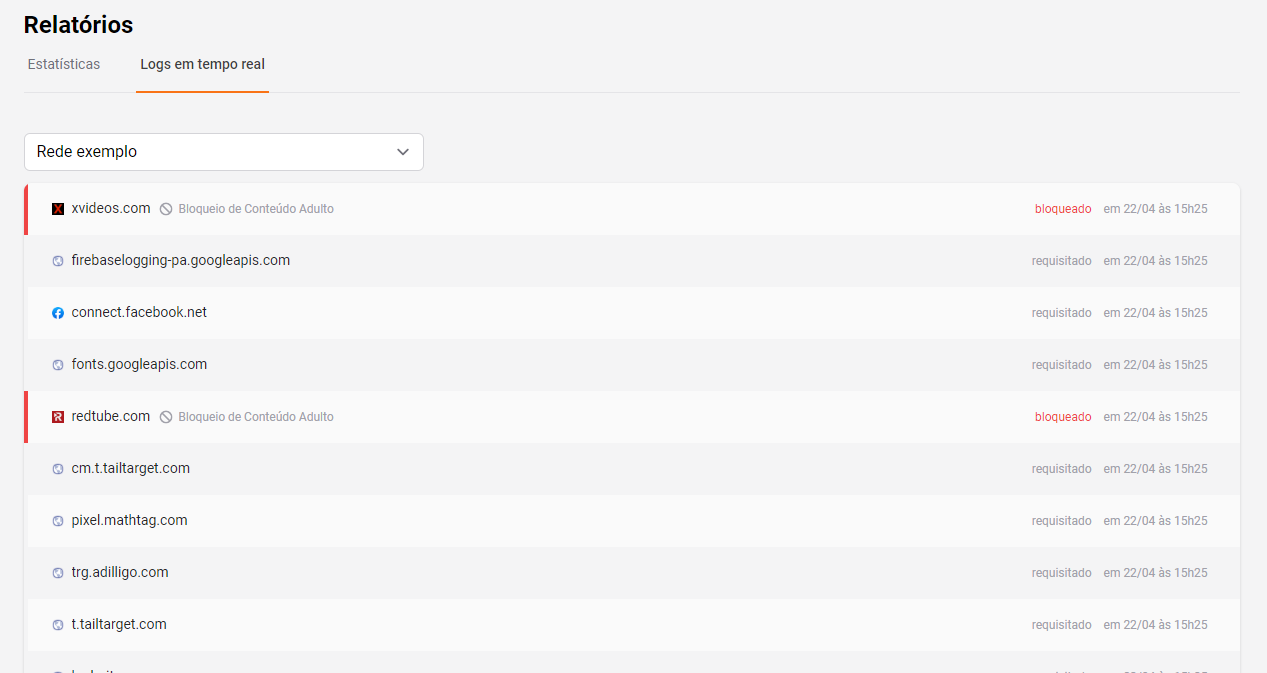
- Real-time logs
- Protected search to remove adult content from major search engines
- Support in Portuguese
Disadvantages of Lumiun DNS
- Does not have complete documentation
- It is in the testing phase
Supplemental security configuration
To prevent attacks from external queries, due to the “Allow Remote Requests” option enabled in DNS, we will define new rules in the Firewall.
Step 1: Access the Firewall
Access the IP → Firewall menu and click the “Add New” button.
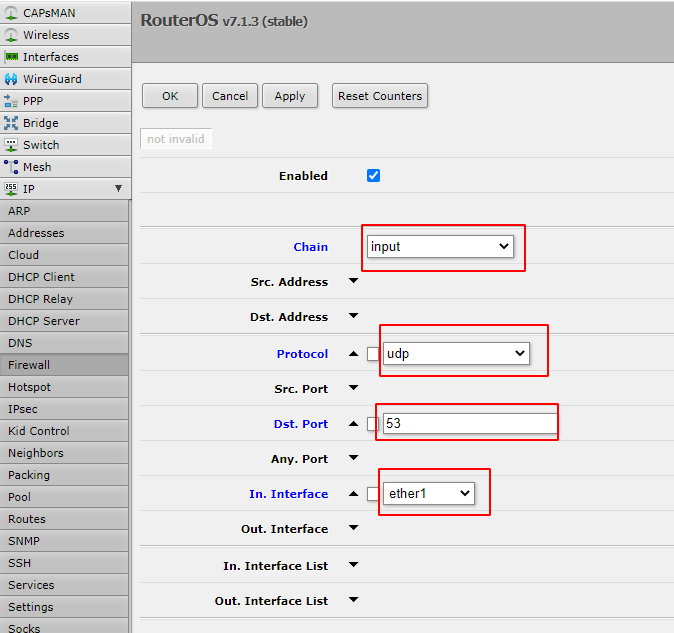
Step 2: Rule to block external queries via UDP
- In the “Chain” field select the “input” option.
- In the “Protocol” field select the “UDP” option.
- In the “Dist. Port” enter the UDP port number “53”.
- In the “In. Interface” select the option that your link is, for example “ether1”.
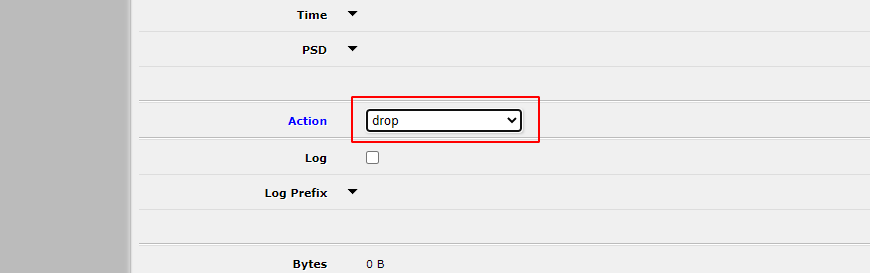
- In the “Action” field select the “Drop” option.
- Click on the “Apply” and “Ok” buttons respectively.
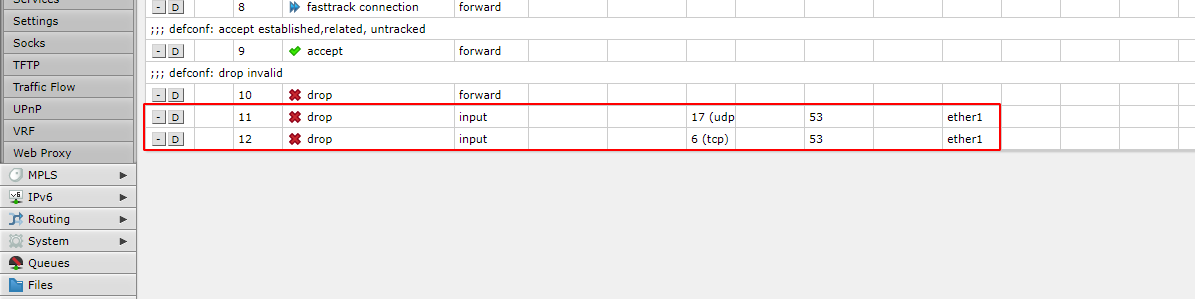
Step 3: Rule to block external queries via TCP
Repeat the steps in the previous step, with the exception of the “Protocol” field where you must now select the “TCP” option.
In the end, you will have two new Firewall rules, as shown in the image below.
NAT redirection
Let's perform a NAT redirect with the aim of forcing network devices to perform queries using the DNS configured in MikroTik.
Step 1: Accessing the NAT rules page
To add a new NAT rule, access the IP → Firewall menu, click on the NAT tab and click on the “Add New” button.
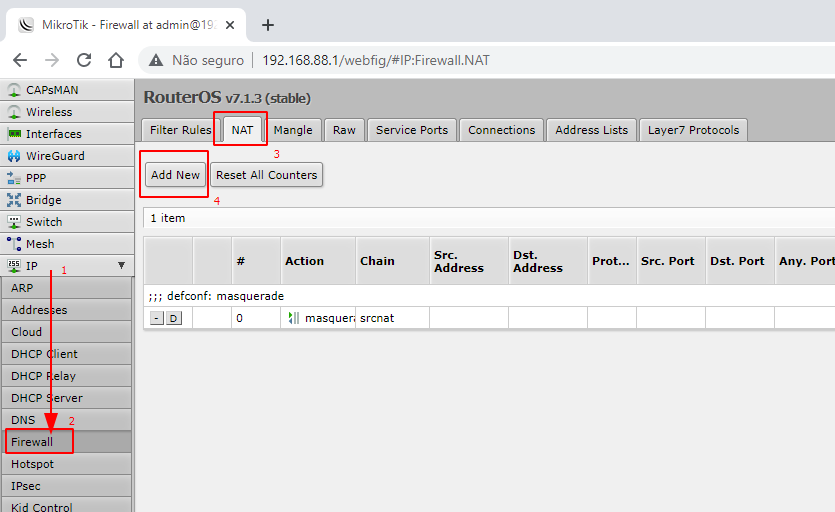
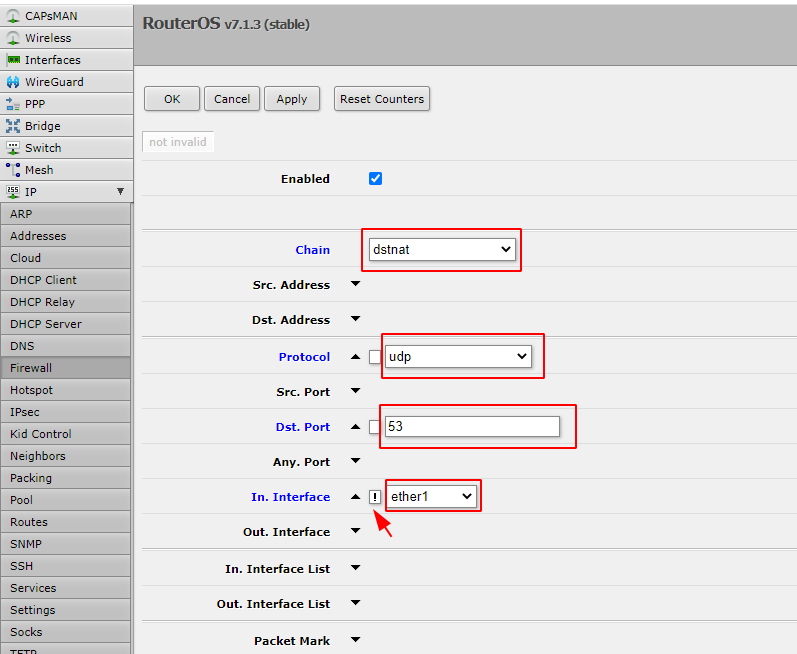
Step 2: Adding new NAT rule
- In the “Chain” field select the “dstnat” option
- In the “Protocol” field select “udp”
- In the “Std. Port” enter port “53”
- In the “In. Interface” select the option that your link is, for example “ether1” and check the box on the side so that the “!” sign appears. (exclamation)
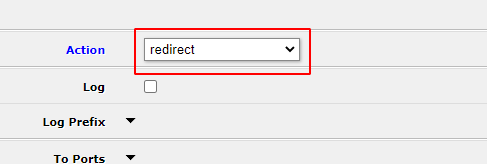
- In the “Action” field select the “redirect” option
- Click on “Apply” and “OK” button respectively
What is the best solution for my network?
It will depend on your needs and time .
If you have the time and don't need to keep up with the blocks, tip 1 would be the most suitable, as it is free. However, it needs periodic reviews of the regular expression and also the addition of exceptions and false-positive domains.
Tip 2 (OpenDNS) is ideal for those who do not have time to maintain lists, do not require many blocking details, need to manage up to 3 different networks, do not have financial resources to invest and do not mind if Brazilian adult content sites run out of block.
Finally, tip 3 ( Lumiun DNS ) is recommended for those who do not have time to manage lists, need a stricter blocking of Brazilian and international websites, need to filter the results of the main search engines, want to view logs and blocking statistics in real-time and want to control the internet of multiple home or corporate networks from a single control panel.
